


Die letzten Tage habe ich meine HTML-basierte Software des „SLSS CarNet Command Centers“ (Hauptartikel: SLSS CarNet*) weiter um- und ausgebaut. Nach der Installation der Hardware im Sommer 2020 konnte ich auf meinen Testfahrten (welche coronabedingt leider nicht so häufig waren wie gehofft) einiges an Erfahrungen und Eindrücken sammeln. Die ersten Erkenntnisse daraus habe ich nun in Form von Updates und Verbesserungen in die Software einfließen lassen. Das es an der einen oder anderen Stelle Verbesserungspotential geben wird, war mir bereits bei der Entwicklung der Soft- und Hardware klar. Ich war ziemlich erstaunt, dass sowohl die GPS-Ortung inkl. Richtungs- und Geschwindigkeitserkennung, als auch andere Komponenten, welche ich vorher nicht während der Fahrt (also „in Bewegung“) testen konnte, auf Anhieb funktionierten. Somit beschränken sich die Verbesserungen auch eher auf Optimierungen in Sachen Performance, Usability und Reaktionsgeschwindigkeit.
Verbesserung der CAN-Bus Reaktionsgeschwindigkeit dank Python
Eine Sache, welche mich schon beim Erstellen der Software beschäftigte, war die Erkennung der über den CAN-Bus gesendeten Botschaften. Ursprünglich nutze ich hierfür ein PHP-Script, welches per „shell_exec()„-Befehl das Lesen der CAN-Daten übernahm. Das Problem hierbei war zum einen, dass dieses Script nicht in einer Endlosschleife laufen konnte, da die so gesammelten Daten nach Zeit-X gespeichert werden mussten und dafür der Lesevorgang beendet werden musste. Zum anderen lief dieses Script innerhalb des „Command Centers“ was dazu führt, dass CAN-Daten nur erfasst wurden, wenn dieses auf einem Gerät ausgeführt wurde.
Um diese Probleme zu lösen, entschied ich mich dazu die Funktionalität des Lesens der CAN-Botschaften auf ein Python-Script umzubauen. Dies bietet den großen Vorteil, dass es während der kompletten Laufzeit per Endlosschleife die Daten auf dem CAN-Bus analysieren kann. Dazu startet das Script mit dem ersten Start der GUI und läuft ab diesem Zeitpunkt unabhängig von der Bedienoberfläche. Die gelesen Daten werden innerhalb des Dauerloops sofort analysiert und anschließend über eine XML-Datei der GUI zur Verfügung gestellt. Dies verbesserte das Ansprechverhalten der GUI hinsichtlich geänderter Werte enorm. Das zuvor benötigte Fehlerhandling für das Schreiben der XML-Datei (die Datei wurde teilweise leer gespeichert) konnte ich ebenfalls minimieren. Dieses kommt jetzt nur noch bei evtl. Systemabstürzen während der Schreibphase der XML-Datei zum Einsatz.
Beim Verbessern der CAN Funktionalität kam unteranderem meine CAN-Bus Analyse Software „SLSS CANAnalyser“ (Hauptartikel: SLSS CANAnalyser*) zum Einsatz, welche ich für die Simulation bereits im Van verbauter und somit am „Basteltisch“ nicht mehr angeschlossener CAN-Hardware nutzte. So konnte zum Beispiel über das simulierte versenden von Temperatur-Botschaften das Schreiben und Lesen deutlich verbessern.
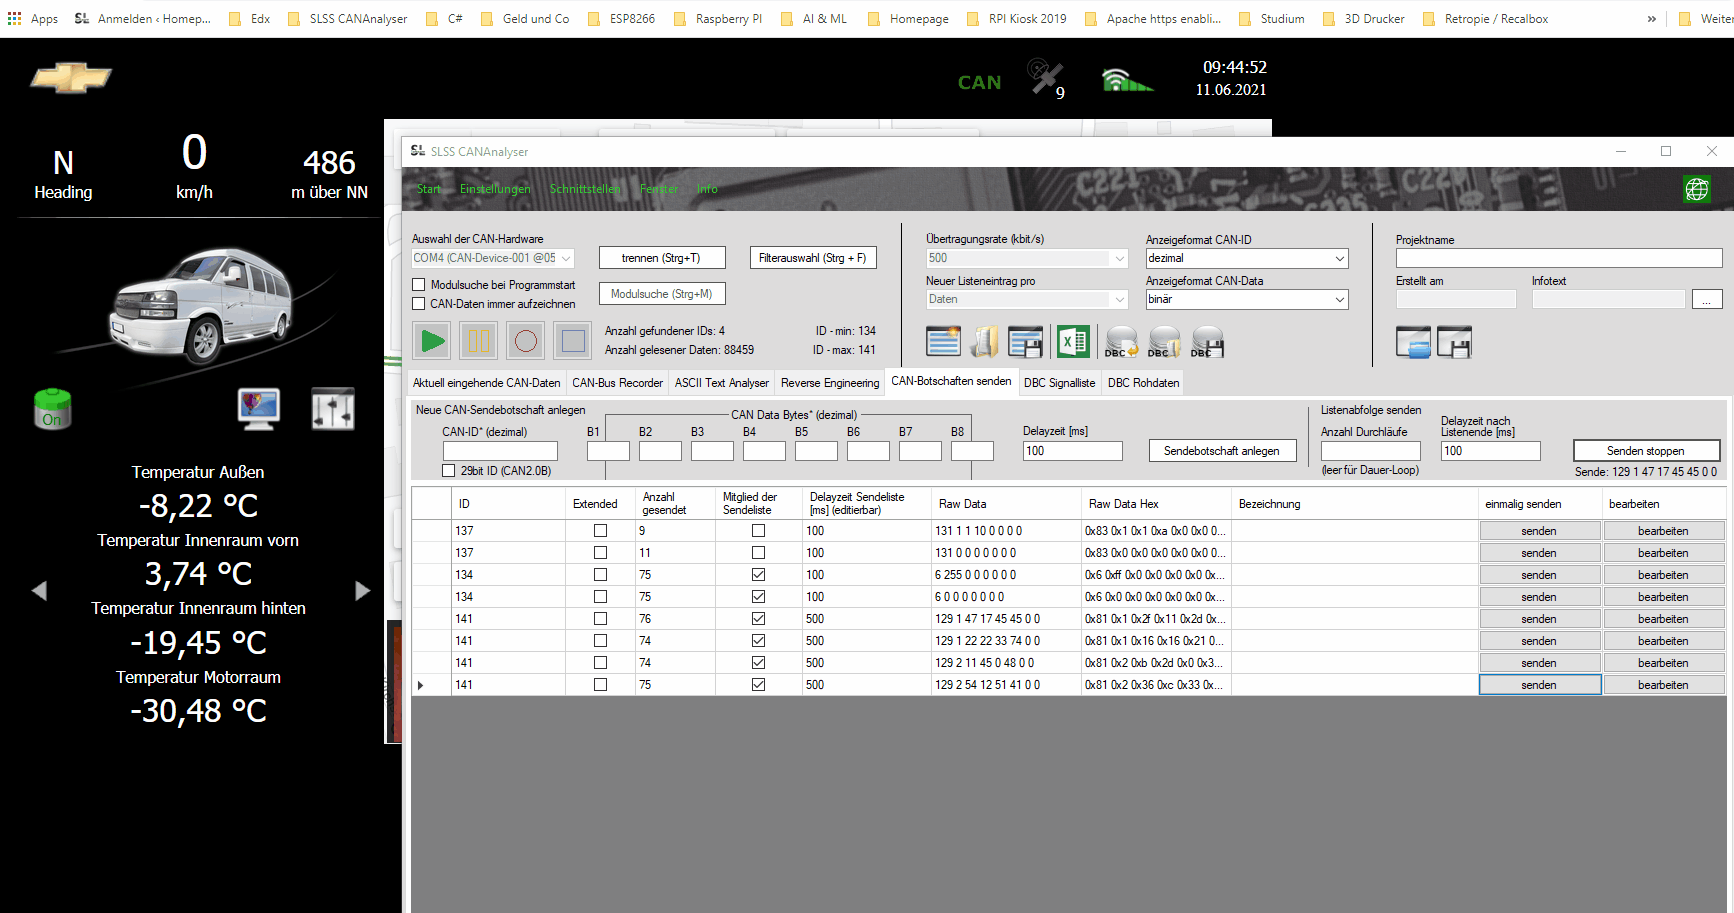
Da ich die CAN-Botschaften beim Entwickeln des Temperatur-Boards selbst definiert und vor allem dokumentiert habe, wusste ich natürlich welche CAN-ID und Byte-Daten ich via CAN Software und Bus-Modul auf den Bus senden muss, um eine entsprechende Reaktion zu erhalten. Damit war es kein größeres Problem das Python-Script auf die ordnungsgemäße Funktion hin zu überprüfen. Möchte ich dem Projekt nun in Zukunft weitere Empfangsfunktionen hinzufügen, so kann ich dies durch das Erweitern dieses Scriptes ebenfalls recht unkompliziert realisieren. Das Script in seiner aktuellen Version sieht wie folgt aus.
import subprocess, threading, os, shutil
from xml.dom import minidom


class MyClass(threading.Thread):
    def __init__(self):
        self.stdout = None
        self.stderr = None
        threading.Thread.__init__(self)

    def run(self):
        p = subprocess.Popen(['timeout' ,'0.5', 'candump', 'can0'], shell=False, stdout=subprocess.PIPE, stderr=subprocess.PIPE)
        self.stdout, self.stderr = p.communicate()

#variable for tempoffset over CAN
tempOffset = 30;

#infinite while loop
while(True):

	#copy Messwerte.Backup.xml if originalfile is broken
	if(os.stat('/var/www/html/Messwerte.xml').st_size == 0):
		shutil.copyfile('/var/www/html/Messwerte.Backup.xml', '/var/www/html/Messwerte.xml')
		print('Messwerte kopiert')
	else:
		print(os.stat('/var/www/html/Messwerte.xml').st_size)
		print('Messwerte nicht kopiert')

	#copy Controls.Backup.xml if originalfile is broken
	if(os.stat('/var/www/html/Controls.xml').st_size == 0):
		shutil.copyfile('/var/www/html/Controls.Backup.xml', '/var/www/html/Controls.xml')
		print('Controls kopiert')
	else:
		print(os.stat('/var/www/html/Controls.xml').st_size)
		print('Controls nicht kopiert')

	#new thread for reading candump
	myclass = MyClass()
	myclass.start()
	myclass.join()

	#load xmlfile Messwerte.xml
	myMeasure = minidom.parse('/var/www/html/Messwerte.xml')

	#read specific xml-Tag tag by tagName
	#print(myMeasure.getElementsByTagName('TempBoard2_Sens1')[0].firstChild.data)

	#split Can Messages
	myCan = str(myclass.stdout).split('\\n')

	#loop over all CA Messages
	for CanMsg in range(0, len(myCan)):
		#try to split can0 to get Message only
		canStr = myCan[CanMsg].split("can0")

		#only if can0 is in CanStr
		if len(canStr) > 1:
			#cut CAN Identifier and convert to decimal number
			canID = str(int(canStr[1][2:5], 16))

			canData = canStr[1].split("]")
			canData = canData[1].split(" ")

			#check submitted Board-ID --> canData[2] --> minimum value of 1 after subtracting 127 (if Value < 1 then its no Board answer)
			boardID = int(canData[2], 16) - 127


			#do some action if boardID matches some Values
			#Action Identification over --> genutzte send-ID (vom Board aus gesehen) from 01_Funktionsübersicht.xlsx (Boardliste)

			#IO Boards (Compact + 3-fach)
			if canID == '140':
				#IO Board sends Status of Input-Pins if Requested via CanCom.php
				print("IO Board Answer!")


			##################
			#  4 Temp-Board  #
			##################
			if canID == '141':

				#check if values from tempsensor 1+2 or 3+4
				sensorSelect = int(canData[3], 16)

				#check if sensors 1 & 2 were submitted
				if sensorSelect == 1:
					#check if decimal places == 2
					nk1 = int(canData[5], 16)
					if nk1 < 10:
						nk1_out = "0" + str(nk1)
					else:
						nk1_out = str(nk1)

					#build tempstring for sensor 1
					tempval_1 = str(int(canData[4], 16) - tempOffset) + "," + nk1_out


					#check if decimal places == 2
					nk2 = int(canData[7], 16)
					if nk2 < 10:
						nk2_out = "0" + str(nk2)
					else:
						nk2_out = str(nk2)

					#build tempstring for sensor 2
					tempval_2 = str(int(canData[6], 16) - tempOffset) + "," + nk2_out

					#modify xml elements for sensor 1 and 2
					myMeasure.getElementsByTagName("TempBoard" + str(boardID) + "_Sens1")[0].childNodes[0].nodeValue = tempval_1
					myMeasure.getElementsByTagName("TempBoard" + str(boardID) + "_Sens2")[0].childNodes[0].nodeValue = tempval_2

				#check if sensors 3 & 4 were submitted
				if sensorSelect == 2:
					#check if decimal places == 2
					nk1 = int(canData[5], 16)
					if nk1 < 10:
						nk1_out = "0" + str(nk1)
					else:
						nk1_out = str(nk1)

					#build tempstring for sensor 1
					tempval_3 = str(int(canData[4], 16) - tempOffset) + "," + nk1_out


					#check if decimal places == 2
					nk2 = int(canData[7], 16)
					if nk2 < 10:
						nk2_out = "0" + str(nk2)
					else:
						nk2_out = str(nk2)

					#build tempstring for sensor 2
					tempval_4 = str(int(canData[6], 16) - tempOffset) + "," + nk2_out

					#modify xml elements for sensor 1 and 2
					myMeasure.getElementsByTagName("TempBoard" + str(boardID) + "_Sens3")[0].childNodes[0].nodeValue = tempval_3
					myMeasure.getElementsByTagName("TempBoard" + str(boardID) + "_Sens4")[0].childNodes[0].nodeValue = tempval_4


			##################
			#  Camera Board  #
			##################
			if canID == '137':
				#load xmlfile Controls.xml
				myControls = minidom.parse('/var/www/html/Controls.xml')

				#check CamStat (1 == power activated | 0 == power deactivated)
				camStat = int(canData[3], 16)

				#check if in reverse gear
				reverseStat = int(canData[4], 16)

				#check running time
				timeToEnd = int(canData[6], 16)


				#if board-power is activated
				if camStat == 1:
					#if cam isnt active yet and also not manually closed, than activate
					if myMeasure.getElementsByTagName("Board_CamCom" + str(boardID) + "_ScreenAktiv")[0].firstChild.data == "0" and
					#ACHTUNG: ZEILENUMBRUCH NUR FÜR DARSTELLUNG AUF HOMEPAGE!
					myControls.getElementsByTagName("Board_CamCom" + str(boardID) + "_ManOff")[0].firstChild.data == "0":
						#set display to active
						myMeasure.getElementsByTagName("Board_CamCom" + str(boardID) + "_ScreenAktiv")[0].childNodes[0].nodeValue = "1"

					#set cam to active
					myMeasure.getElementsByTagName("Board_CamCom" + str(boardID) + "_CamAktiv")[0].childNodes[0].nodeValue = "1"


				#if board-power is deactivated
				if camStat == 0:

					#always reset ManOff because Cam is off
					myControls.getElementsByTagName("Board_CamCom" + str(boardID) + "_ManOff")[0].childNodes[0].nodeValue = "0"

					#actualize Controls xml file
					with open("/var/www/html/Controls.xml", "w") as fs:
						myControls.writexml(fs)
						fs.close()

					#if cam is active yet and should be closed, than deactivate
					if myMeasure.getElementsByTagName("Board_CamCom" + str(boardID) + "_ScreenAktiv")[0].firstChild.data == "1" and
					#ACHTUNG: ZEILENUMBRUCH NUR FÜR DARSTELLUNG AUF HOMEPAGE!
					myMeasure.getElementsByTagName("Board_CamCom" + str(boardID) + "_CamAktiv")[0].firstChild.data == "0":
						#set display to inactive
						myMeasure.getElementsByTagName("Board_CamCom" + str(boardID) + "_ScreenAktiv")[0].childNodes[0].nodeValue = "0"

					#set cam to inactive
					myMeasure.getElementsByTagName("Board_CamCom" + str(boardID) + "_CamAktiv")[0].childNodes[0].nodeValue = "0"


				#if in reverse gear
				if reverseStat == 1:
					#set reverse to active
					myMeasure.getElementsByTagName("Board_CamCom" + str(boardID) + "_RFL")[0].childNodes[0].nodeValue = "1"

				else:
					#set reverse to active
					myMeasure.getElementsByTagName("Board_CamCom" + str(boardID) + "_RFL")[0].childNodes[0].nodeValue = "0"


				if timeToEnd != 0:
					#actualize running time
					myMeasure.getElementsByTagName("Board_CamCom" + str(boardID) + "_RestNachlauf")[0].childNodes[0].nodeValue = str(timeToEnd)

				else:
					#set running time to 0
					myMeasure.getElementsByTagName("Board_CamCom" + str(boardID) + "_RestNachlauf")[0].childNodes[0].nodeValue = "0"

			##################
			#  ENDE BOARDS	 #
			##################

			##################
			#  DEBUG-OUTPUT  #
			##################
			print("Empfangen: " + canStr[1])
			print("ID: " + canID)
			print("Board-ID: " + str(boardID))


	#actualize Messwerte xml file
	with open("/var/www/html/Messwerte.xml", "w") as fs:
		myMeasure.writexml(fs)
		fs.close()
Umbau von Here Maps API auf Google Maps Api
Ein weiterer Schritt war der Umbau meiner Navigationsansicht von der Here Maps Javascript Api* auf die Google Maps Api*. Da ich beim Erstellen der Software anfangs überhaupt keine Erfahrungswerte hatte, ob meine DIY-Navigationsfunktion überhaupt jemals sinnvoll nutzbar sein würde, steckte ich erst einmal nicht allzu viel Arbeit in diese Funktion. Ich suchte dafür nach einer schnellen und kostenlosen Möglichkeit meinen aktuellen Standort auf einer Karte anzeigen zu lassen und beschloss eine evtl. Navigationsfunktion wenn überhaupt erst nachträglich umzusetzen.
Da, wie bereits geschrieben, das Aktualisieren der Position über das verbaute GPS-Modul super funktionierte, entschloss ich mich dazu diese Funktion jetzt mit auf die to-do-Liste zu setzen. Nun hätte ich dies natürlich ebenfalls über die Here Maps Javascript Api* realisieren können, doch gefällt mir die Anzeige der bekannten Google-Maps irgendwie besser. Das brachte mich dazu mich in die Google Maps Api* soweit einzuarbeiten, dass ich die vorhandene Anzeige der Here Maps durch die Karten von Google ersetzen und den Funktionsumfang wie gewünscht erweitern kann.
Nach dem Erstellen eines API-Keys in der Google Developer Console* dauerte es eine Weile sich in der API-Doku und der Funktionsweise der einzelnen Komponenten zurechtzufinden. Hat man jedoch einmal den Dreh heraus und verstanden wie die API arbeitet und man zusätzliche Daten, wie zum Beispiel Verkehrsdaten, Straßensperrungen und Streckeninformationen anzeigen kann, dann macht es echt Spaß sich sein eigenes „Navigationssystem“ zu entwickeln.
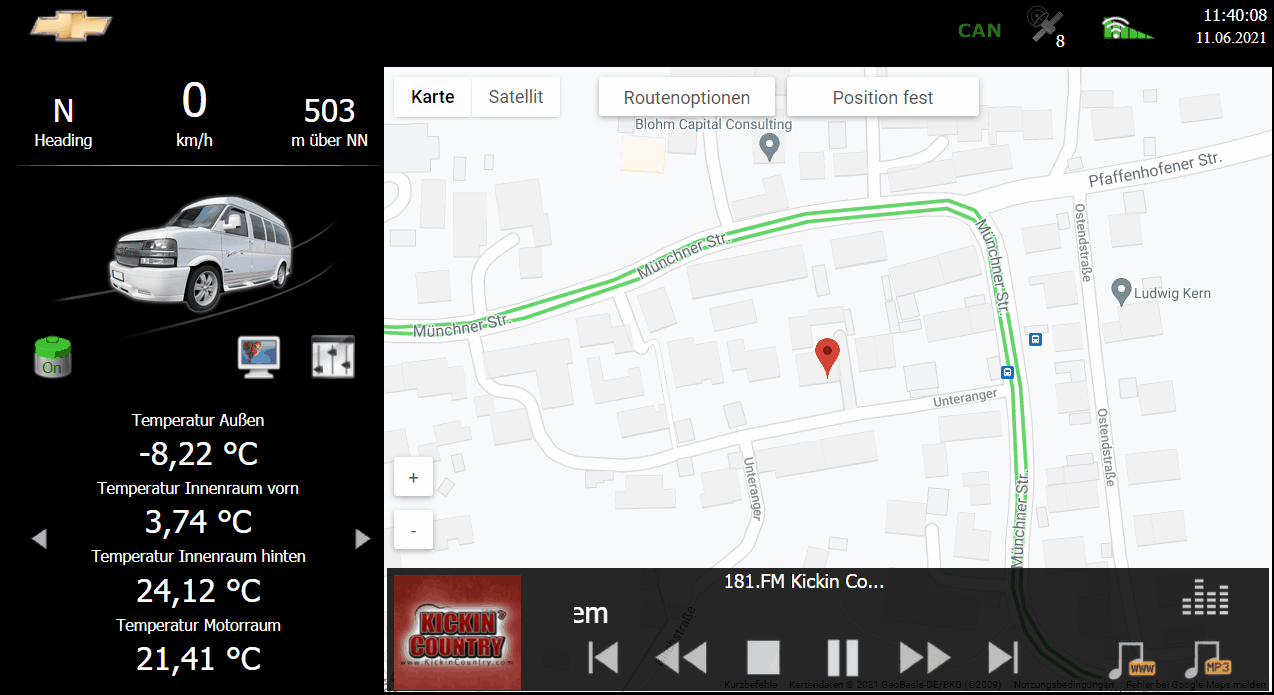
Warum „Navigationssystem“ mit Anführungszeichen
Leider stellt die Google Maps Api keine Point-to-Point Navigation bereit, so wie man es von einem Navigationssystem eigentlich gewohnt ist. So gibt es weder die Möglichkeit die aktuelle Position auf der Route zu setzen, noch die nächste Abbiegung abfangen zu können.
In meiner Umsetzung nutze ich für die aktuelle Position einen „Marker“, dessen Position automatisch durch die empfangenen GPS-Koordinaten aktualisiert wird. Zur Routenauswahl nutze ich die Google Directions Api*, welche nach dem Berechnen der Route als Overlay über die Karte der Maps API gelegt werden kann. Die Bedienung erfolgt über Bedienknöpfe, welche ich als eigenständige „divs“ auf der Karte platziert habe und bei Bedarf einblende oder aktualisiere. Für die Steuerung der Funktionen habe ich Java-Script Funktionen angelegt, da ich auf diese aus allen Bereichen der GUI zugreifen kann.
Somit ist diese Umsetzung also kein klassisches Navigationssystem, sondern eher ein Routenvorschlag mit aktueller Positionsangabe. Für eine Aktualisierung der Strecke, wenn man zum Beispiel einmal die Route verlassen haben sollte, kann man einfach einen Button betätigen, womit eine Neuberechnung der Route ab der aktuellen Position durchgeführt wird. Mit diesen Einschränkungen kann ich denke ich ganz gut leben und falls Google den Funktionsumfang um die Point-to-Point Navigation erweitern sollte, steht einer Nachrüstung ja nichts im Wege. Der Vollständigkeit halber hier noch der aktuelle Code meines „Navigationssystems“.
Hinweis: Meinen API-Key habe ich entfernt und durch den Platzhalter „[API_KEY HIER]“ ersetzt!
<!DOCTYPE html>
<html>
  <head>
    <title>SLSS Navigation Map</title>
    <meta name="viewport" content="initial-scale=1.0">
    <meta http-equiv="Content-Type" content="text/html; charset=utf-8" />
    <style>
      /* Always set the map height explicitly to define the size of the div
       * element that contains the map. */
      #map {
        height: 100%;
      }
      /* Optional: Makes the sample page fill the window. */
      html, body {
        height: 100%;
        margin: 0;
        padding: 0;
      }
	  .myButton {
	    /* Set CSS for my navigation buttons */
		background: none padding-box rgb(255, 255, 255);
		display: table-cell;
		border-style: solid;
		border-width: 2px;
		border-color: #ffffff;
		border-radius: 3px;
		box-shadow: 0px 2px 6px rgba(0,0,0,.3);
		cursor: pointer;
		margin-top: 8px;
		margin-bottom: 22px;
	  }
	  .myText {
		text-align: center;
		vertical-align: middle;
		color: rgb(86, 86, 86);
		font-family: Roboto, Arial, sans-serif;
		font-size: 18px;
		line-height: 38px;
		border-bottom-right-radius: 2px;
		border-top-right-radius: 2px;
	  }
    </style>
  </head>
  <body>

	<!-- Map Layer -->
    <div style="position: absolute; width: 888px; height: 625px" id="map"></div>

	<!--Panel für Route -->
	<div id="right-panel" style="position: absolute; width: 301px; height: 405px; left: 550px; top:80px; background-color: #F5F5F5; overflow: scroll; display: none; opacity: 0.85;";></div>

	<!-- Button zoom + -->
	<div style="position: absolute; top: 382px; left:10px; width: 35px; height: 35px; display:block;" id="zoomPlus" class="myButton" onclick="doZoom(true);">
	<div id="zoomTextPlus" class="myText">+</div></div>

	<!-- Button zoom - -->
	<div style="position: absolute; top: 435px; left:10px; width: 35px; height: 35px; display:block;" id="zoomMinus" class="myButton" onclick="doZoom(false);">
	<div id="zoomTextMinus" class="myText">-</div></div>

	<!-- Button Routenoptionen -->
	<div style="position: absolute; top: 2px; left:215px; width: 172px; height: 35px; display: block;" id="myButton0" class="myButton" onclick="showControls();">
	<div id="myText0" class="myText">Routenoptionen</div></div>

	<!-- Button Navigation starten -->
	<div style="position: absolute; top: 382px; left:10px; width: 188px; height: 35px; display: none; background: none padding-box rgb(0, 230, 0); border-color: rgb(0, 220, 0);; box-shadow: 0px 2px 6px rgba(0,210,0,.3);" id="myButton1" class="myButton" onclick="startNav();">
	<div id="myText1" class="myText">Zielführung starten</div></div>

	<!-- Button Navigation starten -->
	<div style="position: absolute; top: 435px; left:10px; width: 188px; height: 35px; display: none; background: none padding-box rgb(255, 0, 0); border-color: rgb(245, 0, 0);; box-shadow: 0px 2px 6px rgba(235,0,0,.3);" id="myButton2" class="myButton" onclick="abortNav();">
	<div id="myText2" class="myText">Zielführung abbrechen</div></div>

	<!-- Button hide / show Trackpoints  -->
	<div style="position: absolute; top: 2px; left:607px; width: 88px; height: 35px; display: none;" id="myButton3" class="myButton" onclick="showHideListView();">
	<div id="myText3" class="myText">Liste aus</div></div>

	<!-- Button aktuelle Position tracken  -->
	<div style="position: absolute; top: 2px; left:403px; width: 188px; height: 35px; display:block;" id="trackPos" class="myButton" onclick="freeMovement('button');">
	<div id="trackPosText" class="myText">Position fest</div></div>

<script>
	//Variable declaration
	var latitude =  48.371835;
	var longitude = 11.519391599999999;
	var map, marker, myLatlng, directionsService, directionsRenderer, trafficLayer, savedDestination;
	var loaded = false;
	var isNavigated = false;
	var freeToMove = false;
	var trafficSetted = true;
	var mapZoom = 18;

	//avoid highlighting
	function disableselect(e)
	{
		return false;
	}
	function reEnable()
	{
		return true;
	}

	document.onselectstart=new Function ("return false");
	if (window.sidebar)
	{
		document.onmousedown=disableselect;
		document.onclick=reEnable;
	}

	//initialize map for navigation
	function initMap()
	{
		map = new google.maps.Map(document.getElementById('map'),
		{
		  center: {lat: latitude, lng: longitude},
		  zoom: mapZoom,
		  zoomControl: false,
		  fullscreenControl: false,
		  streetViewControl: false
		});

		//set Marker of Homeposition
		myLatlng = new google.maps.LatLng(latitude, longitude);
		marker = new google.maps.Marker({ position: myLatlng, title:"StartMarker"});
		trafficLayer = new google.maps.TrafficLayer();

		// To add the marker to the map, call setMap();
		map.setCenter(marker.position);
		marker.setMap(map);
		trafficLayer.setMap(map);

		//set loaded variable to true
		loaded = true;
		freeMovement('false');

		/*
		//ONLY FOR DIRECTLY TESTING MY NAVIGATION-FUNCTION
		const locationButton = document.createElement("button");
		locationButton.textContent = "starte Navigationstest";
		locationButton.classList.add("custom-map-control-button");
		map.controls[google.maps.ControlPosition.TOP_CENTER].push(locationButton);
		locationButton.addEventListener("click", () => {calcRoute();});
		*/
	}

	//show map after initialication
	function showMap(myLatitude, myLongitude)
	{
	   //check if map is loaded
	   if(loaded == true)
	   {
			//remove the old marker
			marker.setMap(null);

			//set latitude, longitude and markerposition for map
			myLatlng = new google.maps.LatLng(myLatitude, myLongitude);
			marker = new google.maps.Marker({ position: myLatlng, title:"Current GPS"});

			// To add the marker to the map, call setMap();
			marker.setMap(map);

			//check if map is free to move or centered over actual position
			if(freeToMove == false)
				map.setCenter(marker.position);

			//override values of latitude and longitude
			latitude = myLatitude;
			longitude = myLongitude;
	   }
	}

	//button for opening navigation menu
	function showControls()
	{
		parent.iframeDel('HtmlMainMenu');
		parent.jsLink('NaviDestination.htm','HtmlMainMenu');
		parent.jsShow('ldheLayer_MainMenu',1);
		return false;
	}

	//Route calculation after entering destination
	function showHideListView()
	{
		//only if navigation is setted
		if(isNavigated == true)
		{
			//check if right-panel is shown
			if(document.getElementById('right-panel').style.display == 'block')
			{
				//hide panel with routeoptions
				document.getElementById('right-panel').style.display= 'none';
				document.getElementById('myText3').innerHTML = 'Liste an';
			}
			else
			{
				//hide panel with routeoptions
				document.getElementById('right-panel').style.display= 'block';
				document.getElementById('myText3').innerHTML = 'Liste aus';
			}
		}
		else
		{
			//hide panel with routeoptions
			document.getElementById('right-panel').style.display= 'none';
			document.getElementById('myButton3').style.display= 'none';
		}
	}

	//Route calculation after entering destination
	function calcRoute(destination, redirect = false)
	{
		//try to abort old navigations
		if(isNavigated == true)
			abortNav();

		//set loaded to false to avoid positioning while navi decision
		loaded = false;

		//init google directions Services (for routing)
		directionsService = new google.maps.DirectionsService();
		directionsRenderer = new google.maps.DirectionsRenderer();

		//set direction to google map
		directionsRenderer.setMap(map);
		directionsRenderer.setPanel(document.getElementById("right-panel"));

		//start and endpoint
		var start = myLatlng;
		var end = destination;
		var request =
		{
			origin: start,
			destination: end,
			travelMode: 'DRIVING'
		};

		//if route request is OK show route
		directionsService.route(request, function(result, status)
		{
			if (status == 'OK')
			{
				directionsRenderer.setDirections(result);

				//add route to file with last destinations when not redirected
				if(redirect == false)
					parent.jsLink('NaviSetLastDestination.php?destination=' + destination,'Linkframe');

				//set destination to savedDestination for reset of startpoint
				savedDestination = destination;
			}
		});

		//show buttons for navigation start or navigation abort
		document.getElementById('myButton1').style.display= 'block';
		document.getElementById('myButton2').style.display= 'block';

		//show panel with routeoptions and set isNavigated to true for showing panel with stops
		document.getElementById('right-panel').style.display= 'block';
		isNavigated = true;

	}

	//start navigation
	function startNav()
	{
		//hide buttons for navigation start or navigation abort
		document.getElementById('myButton1').style.display= 'none';
		document.getElementById('myButton2').style.display= 'none';

		//set text for buttn to hide listview and then show button
		document.getElementById('myText3').innerHTML = 'Liste aus';
		document.getElementById('myButton3').style.display= 'block';

		//set loaded to true that map positioning starts to actual location
		loaded = true;

		//reset free movement
		freeMovement('false');

		//set zoom of map
		map.setZoom(mapZoom);
	}

	//abort navigation
	function abortNav()
	{
		//hide buttons for navigation start or navigation abort
		document.getElementById('myButton1').style.display= 'none';
		document.getElementById('myButton2').style.display= 'none';
		document.getElementById('myButton3').style.display= 'none';

		//set loaded to true that map positioning starts to actual location
		loaded = true;

		//unload the direction route
		directionsRenderer.setMap(null);
		directionsRenderer.setPanel(null);

		//show panel with routeoptions and set isNavigated to true for showing panel with stops
		document.getElementById('right-panel').style.display= 'none';
		isNavigated = false;

		//reset free movement
		freeMovement('false');

		//set zoom of map
		map.setZoom(mapZoom);
	}

	//zoom map in and out
	function doZoom(inout)
	{
		//check to witch direction should be zoomed
		if(inout == true)
		{
			mapZoom += 1;
		}
		else
		{
			mapZoom -= 1;
		}

		//set new zoom factor
		map.setZoom(mapZoom);
	}

	//function to enable / disable free map movement
	function freeMovement(statustext)
	{
		if(document.getElementById('trackPosText').innerHTML == 'Position fest' && statustext == 'button')
		{
			document.getElementById('trackPosText').innerHTML = 'Position frei';
			freeToMove = true;
		}
		else
		{
			document.getElementById('trackPosText').innerHTML = 'Position fest';
			freeToMove = false;
		}

		if(statustext == 'false')
		{
			document.getElementById('trackPosText').innerHTML = 'Position fest';
			freeToMove = false;
		}
	}

	//reset Startpoint with actual position
	function reloadStartPoint()
	{
		//start route calculation with saved Destination
		if(savedDestination != null)
		{
			//calc route with redirect to true and start navigation immediately
			calcRoute(savedDestination, true);

			//set new zoom factor
			map.setZoom(mapZoom);

			//start navigation immediately
			startNav();
		}
	}

	//reset Startpoint with actual position
	function showHideTraffic()
	{
		//start route calculation with saved Destination
		if (trafficSetted == true)
		{
			trafficLayer.setMap(null);
			trafficSetted = false;
		}
		else
		{
			trafficLayer.setMap(map);
			trafficSetted = true;
		}
	}

</script>

<!-- API KEY WURDE IN FOLGENDER ZEILE ENTFERNT -->
<script src="https://maps.googleapis.com/maps/api/js?key=[API_KEY HIER]&callback=initMap"async defer></script>
</body>
</html>
Da ich mit dem hier gezeigte Code noch nicht zu 100% fertig bin, habe ich mich noch nicht um eine durchgängig hübsche Formatierung gekümmert und das eine oder andere Kommentar fehlt vielleicht auch noch. Das Hin- und Herspringen zwischen deutsch- und englischsprachigen Kommentaren versuche ich mir auch gerade abzugewöhnen 🙂 . Sollte es Fragen zum Code geben, können diese jedenfalls gern in die Kommentare gepostet werden.
Fazit
Ich denke ich habe mit den aktuellen Änderungen / Erweiterungen das Projekt ein ganzes Stück voran gebracht. Jetzt steht dem Einbau weiterer Hardware-Komponenten nichts mehr im Weg und ich denke bereits über eine kompakter und platzsparendere Version meiner Hauptplatine nach, da ich auch hier am Anfang lieber mehr Platz gelassen habe, um auf evtl. Änderungen noch reagieren zu können.
Das ganze Thema ist schon ein wenig „Nerdi“, was den Kreis zum Fachsimpeln von vorn herein schon mal einschränkt. Solltet also jemand etwas ähnliches vorhaben, oder schon mitten in solch einem Projekt stecken, so bin ich an einem Erfahrungsaustausch jederzeit interessiert.